Of all components used within the RailNetDCC system, the throttle is by far the most common and intuitive to use. To facilitate it's use even further, I've ported the application to a PocketPC version for those of you who may have wireless networks and desire a cordless walkaround throttle. You may run as many throttle applications as you like on multiple PC's, or run them all on a single PC. I've also enabled hot buttons to switch between up to ten locomotives easily.
How It Works
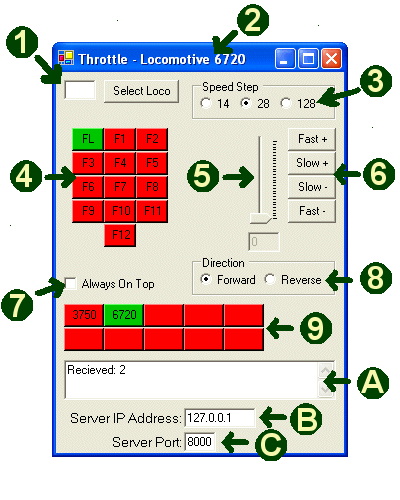
Although simple and intuitive to use, here is a breakdown of the throttle's components and their use.

1 - Locomotive Selection Text Box and Button
To select a locomotive that you don't already have in the Active Locomotive Fastswitch Bar (9), enter the locomotive's DCC address in the text box and click on the Select Loco button. The locomotive will be added to to the Active Locomotive Fastswitch Bar, the number will appear in the title bar of the application, and some initial settings will be set such as setting the throttle to zero and turning on the headlight.
2 - Application Title Bar
The title bar reflects the active locomotive for easy switching between multiple instances of the Throttle application on your PC.
3 - Speed Step Selection
This set of radio buttons is used to switch between 14, 28, or 128 speed steps for the active locomotive. Simply click on the appropriate radio button to select a new speed step setting.
4 - Function Selection Table
A table of buttons is presented to toggle on/off functions F0 - F12. To activate a function, simply click on the button and the function will be activated on your locomotive and the button will turn green. To turn the function off, click on the button once more and the function will be deactivated on your locomotive and the button will turn red.
5 - Speed Selection Slide Bar
The Speed Selection Slide Bar can be used to make large changes in the locomotive's speed, simply click and drag the slide up to increase speed, or down to decrease speed.
6 - Speed Buttons
The Speed Buttons provide an alternate method to modify your locomotive's speed selection. The + buttons increase speed while the - buttons decrease; in addition, the buttons marked Fast change the speed in increments of 4 while the buttons marked Slow change in increments of 1. As you change the speed with these buttons, the Speed Selection Slide Bar will be moved to reflect the change in speed.
7 - Always On Top CheckBox
This checkbox allows you to ensure your throttle is always the application shown in the foreground. This is especially useful if you run multiple applications on your PC.
8 - Direction Selection
This set of radio buttons allows you to choose which direction the locomotive is travelling. Simply select the radio button next to the direction you wish the locomotive to travel in.
9 - Active Locomotive Fastswitch Bar
This set of buttons allows you to quickly change from one locomotive to another. The currently active locomotive is the button in green while all the remaining locomotive buttons are in red. To control a different locomotive, simply click on it's button in the Fastswitch Bar and it will be set as your active locomotive and all current settings will be reflected in the rest of the Throttle application.
A - Message Window
Currently, this window is used to display the number of acknowledgement data packets the Throttle application has recieved from the RailNetDCC Server.
Future development will enable Server to Throttle messages (such as when another operation tries to select one of your already select locomotives), Throttle to Throttle messages (for those large layouts or open houses where yelling won't work ;-) ), and Dispatcher to Engineer messages.
B - Server IP Address
This textbox allows you to enter the IP Address of the computer that is running the Server (not DCC Server) application. I currently run all of the applications on my desktop computer, therefore I enter either the Loopback IP Address (special name for reserved IP Address to use when the computer needs to talk to itself) as in this example, or the IP Address I manually assigned to the computer through the network control panel.
C - Server Port
This textbox allows you to enter the port number I selected in the Server (not DCC Server) application to listen on for instructions from applications such as the Throttle, Accessory, and Programmer applications. A good analogy to use are Post Office boxes. In the Server application, I specified to listen on port 8000, so I enter that port number in this textbox. Through the use of the IP Address (specifying which post office) and the port number (specifying which mailbox), the Throttle application knows where to send the instructions (mail) to.
Downloads
RailNetDCC Throttle - last updated 3/13/2006
This application was written with .Net, you must have the .Net components loaded for this application to function. The components can be downloaded and installed from Windows Update.
PocketPC RailNetDCC Throttle - last updated 11/22/2005
The Ethan Button for the PocketPC Throttle
The Ethan button is named after my first son and was written for him. When you press the Ethan button, the size of F2 button is enlarged to take up the whole screen. This made it easy for Ethan when he was 2 to blow the train whistle on my layout. Click on the Ethan button to return F2 to it's normal size.

